Jean Day Miniatures Home Page
   Jean Day Miniatures 
 Lady's Dresser Set Project


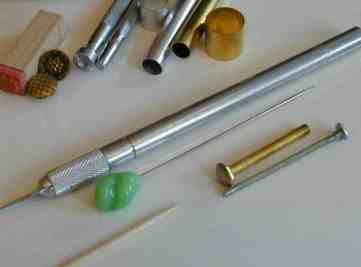
Lady's Dresser Set

Tools and Supplies

Ceramic tile 
Pasta Machine or rolling pin
Needle tools, hat pin or toothpicks
Xacto knife and sharp blades
Gray and white fimo or other polymer clay
Fine silver colored beading wire
Two beads for the bottom of the two jars
Small photo for inside the photo frame
Tools for cutting circles, Kempler cutters or brass tubes 1/4" &  3/8".
Tools for pressing designs, leather tools, buttons or rubber stamps.
Fine metal spring or fine screw as shown below.
Silver leaf and leafing adhesive, I use Delta Renaissance Adhesive
Cut out pattern for the dresser set, click on button and print out


Getting Started

Work with very clean hands. I like to use hand wipes, they are also very good for cleaning your tools or you can use baby oil. Soften a piece of gray fimo and roll it through the pasta machine or with a roller by hand. Roll it thicker in the pasta machine and gradually  thinner. Work with a rolled out piece that is approximately 1/16"  thick on a tile or other suitable working surface. Punch out two circles 3/8" or whatever size would fit the top of your beads shown in photo above and punch out one circle 1/4".
With the printed 'cut out pattern' on top of your fimo press the dresser mirror, brush, comb, hook and mirror designs into your rolled out fimo. Lift off the pattern and cut around the edges of the shapes with an Xacto knife.


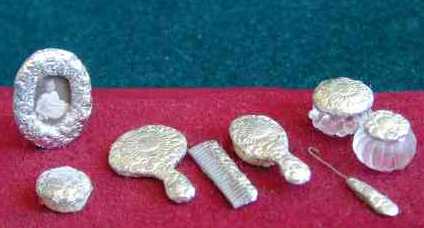
Embossing Your Design
Now you are ready to decide what kind of filigree pattern you would like your dresser set to have. For the project above I used leather punch tools but you can press a design in your pieces with rubber stamps ( clean the stamp first with a bit of baby oil), a toothpick or pin, buttons.... anything that will give an embossed effect that appeals to you.
Gently round the edges of all the pieces to give a nice finish. 

The Comb
Emboss the top part of the comb. Press the screw or spring to make a tooth design in the bottom part comb.

 Hair Brushes
Take one of the 3/8" circles and shape it slightly oval. This will be hand held hair brush. Emboss your design in the gray oval. Cut an oval shape smaller than the top out of white fimo, this piece for the bristles of the hair brush. With a pin put brush hair marks around the edges of the bristle part.
Make the other hair brush with the handle with the same method. Don't attach the fimo bristle part to the fimo handle parts at this time.

Mirror
After you have embossed your design into the mirror shape cut the center out in a size that will suit your photo. 

Button Hook
Cut a piece of bead wire 1/2" in length and put a tiny hook on the end and insert it into the
bottom hook piece of fimo.

You can now bake all of the pieces while still on the tile. 
Bake at 265 degrees for 15 minutes.

Silver Leafing your Dresser Set

Once all of your pieces have cooled.   Apply the adhesive with a small brush to all sides of the gray fimo pieces. Make sure all parts are covered Let this dry clear. Now take small pieces of your silver foil and apply it to the dresser pieces on all sides. Press the foil down into the design to press it into the grooves of the design. After you finish leafing all of the pieces apply an clear acrylic protective sealer. Glue the white fimo bristle parts of your brushes to the upper parts.
Cut out your photo or picture and glue to the back of the frame. Cut out a small rectangle of cardstock, fold in half and glue to the back of the photo frame to make it stand.
 

© Jean Day Miniatures 2002
Backgrounds thanks to Snickerdoodle Graphics